exercise 10: extending the template to complete metadata this exercise will walk you through adding more information to the “starting point
Exercise 10: Extending the Template to Complete Metadata
This exercise will walk you through adding more information to the
“starting point” metadata for COMMON_INTEREST_POINT. You are starting
with a template that you created and imported in Exercise 9.
Under normal circumstances, you would be familiar with this layer, as
it would be one of your own data sets. You would have information (or
know where to find information) about this data set so that you could
complete its metadata. For this exercise, this document will provide
input for you to enter into the metadata through the editor. This will
give you:
*
The opportunity to visit all the key sections required for FGDC
metadata,
*
Get familiar where sections are located in the metadata structure,
*
Work with the in-line help and hints,
*
Get comfortable with the editor functionality, and
*
Get a chance to deal with some of the quirkier, more nuanced
aspects of the editor.
This exercise breaks down the metadata update into 6 steps, five you
will move through during this exercise with an optional step at the
end if you have time:
1. Key Descriptive and contact Information (15 minutes + 5 minutes
recap)
2. Entity and Attribute (Fields) Information (20 minutes + 5 minutes
recap)
3. Quality and Lineage (20 minutes + 5 minutes recap)
4. Constraints and Keywords (15 minutes + 5 minutes recap)
5. Resource Citation and Other Miscellaneous (15 minutes + 5 minutes
recap)
6. Quality Assessment and Publication (Optional)
After you work on each step for the time allotted, the instructor will
briefly recap and answer any questions before moving onto the next
step.
This sequence is not the same as the 7 sections of the FGDC standard.
Each section below provides a bulleted list of elements that are
addressed followed by the classroom workbook page where you will find
it, in parentheses, e.g., (38). This 6-step sequence is not a linear
step-though of the editor pages; rather it breaks down your “attack”
of the metadata into digestible pieces, focusing on the most important
stuff (in my opinion) first. You will have to move back and forth in
the editor, but the navigation bar on the left makes this easy, and
the required path for each element is provided in the underlined path.
In order to use your time efficiently, narrative sections of the
metadata that are requested in this exercise can be copied from this
document and pasted into the appropriate section of the metadata. This
document is CreatingMetadataExercise10.doc found in
C:\Student\CreatingMetadata. This way you will become familiar with
the metadata structure without sacrificing the time necessary to type
in the content. Sections in this document that can be copied and
pasted are indicated in red text.
As you paste from this word doc you notice that the red font and
italics will persist in the metadata. This can be ‘cleaned-up’ using
the formatting toolbars in the editor. Be aware, however, that ‘fancy’
formatting is not maintained when your metadata is exported to FGDC.
To get started, open ArcCatalog, and navigate to the
CreatingMetadata.gdb. Select COMMON_INTEREST_POINT. Open the Metadata
Editor in ArcCatalog
Step 1: Key descriptive and contact information
*
Title (38)
*
Description (Abstract) (38)
*
Summary (Purpose) (38)
*
Resource Details (46)
*
Resource Extents (47)
*
Resource Maintenance (49)
*
Point of Contact (48)
*
Metadata Contact (45)
*
Distribution Contact – Distributor (58)
Navigation Panel: Overview>Item Description:
*
Title (38) – Enter Points-of-Interest and location of other
landmarks in King County
*
Description (Abstract) (38) – Enter Authoritative
Points-of-Interest layer for King County. Contains over 45
different domain classes showing locations and names for a range
of different features. Some classes of features are extensively
documented (such as school sites and hospitals) while other
classes represent a selected set of all the features of that type
(such as hotels and shopping centers)
*
Summary (Purpose) (38) – Enter Location and description of various
points of common interest. Includes abbreviation of name for
labeling purposes, and cross-reference to King County address
database, ADDRESS_POINT.
You’ll notice that the red background in “Required” boxes goes away as
you add information. The ! hints at the top of the editor also
dynamically change depending on your actions.
Navigation Panel: Resource>Details:
*
Status (46) – You may see a “status code is required” hint. Click
on “+ New Status” if necessary and you will see a red required tag
– Status. Choose the appropriate code. Realistically, there are
more code choices than actually allowed in the FGDC standard.
Completed could be chosen if the data set is basically designed
and set-up and is in production, which is the case for
COMMON_INTEREST_POINT. If it is truly in a planning or a
development stage, other choices may be appropriate. When a data
set is retired, the code could be changed to reflect this.
Navigation Panel: Resource>Extents:
*
Temporal Interest Extent (47) - In ArcGIS Metadata “Extents”
refers to both geographic extents and temporal extents. Notice
that you have only a single hint: “Temporal extent is required”.
Expand the “Extent” section by clicking on the arrow. Now expand the
“Bounding Box” section. Notice that the bounding coordinates are
already populated as this is accomplished by synchronization.
Click on the + in front of “New Temporal Instant Extent”. Now you have
access to a calendar, but also you added a new hint: “Description is
required for temporal extents”. Click on the calendar icon. Assume
that you just edited/updated this feature class during the middle of
December last year to make it current for several key classes of data,
i.e., school site, hospitals and police stations. Choose the last day
it was edited, say December 17, 2015. Even though your editing may
have spanned multiple days/weeks, ArcGIS metadata requires date
resolution to a day. This use to be more flexible in the old editor –
mimicking the actual intent of the FGDC standard, but you really don’t
have any choice here. The calendar does have the added benefit that
dates are now all entered consistently.
What to put in the “Description” box? The acceptable FGDC terms have
historically been “Publication Date” or “Ground Condition”. “Publication
Date” meaning that the information in your data set is current, based
on your source data, to the date you have chosen. “Ground Condition”
means that your data is current to what is on the ground in the real
world. For a data set like this, which represents actual features on
the ground, i.e., school sites, hospitals, libraries, etc., enter
Ground Condition.
Some other hints for future work:
Notice that there is also a section titled “New Temporal Period
Extent”. You add either a single temporal extent (date) like you did
just now above, or a “Period Extent”, but not both. A “Period Extent”
is useful if your data set has data in it that represents a timeframe.
For example, in documenting an aerial imagery data set, you could
choose the range of dates over which the imagery was acquired, say May
1st through June 15th, for example.
What if you have data sets that are continually edited, say on a daily
or weekly basis? Expecting stewards to update the temporal instant
(currency date) constantly may be impracticable. Instead, the date
could reflect a quarterly or other time period where the metadata is
given a review, new process steps are added, etc. Then in the
“Description” box for this data set, the phrasing can be modified to
something like “Updated weekly (or daily)”.
Navigation Panel: Resource>Maintenance:
*
Update Frequency (49) – Choose the value from the drop-down menu
that best defines how often the data is updated. Because of the
range of classes of data in COMMON_INTEREST_POINT, some classes
are updated more often than others. So As Needed is a good choice
here.
Navigation Panel: Resource>Points of Contact:
*
Contacts (48) – This information should be complete as it was
originally entered into the template that you imported. If it is
not, enter the following information into the “Contact” section:
“Name”, “Organization”, and “Role” (choose from drop-down).
If necessary, expand the “”Contact Information” section to enter the
details: “Address Type” (choose from drop-down), “Address” (per ArcGIS
hints, this is not required, but seems like a logical piece of
information to include), “City”, ”State”, ”Postal Code”, ”Country” and
”Phone”.
If you need to enter information, use your own contact information.
Navigation Panel: Metadata>Contacts:
*
Metadata Contacts (45) – These items were not addressed in the
template so should be blank. But because there is the option (at
the bottom of the screen) to “Load a Contact” you should have at
least one option – to load the information previously found in the
“Points of Contact”. Click the “+ Load” on the right side of the
contact name. It should add a contact above which can be expanded
to inspect what has been loaded. You may have to edit some
information if your Metadata Contact is different from the data
set Point of Contact. For example, the address information is the
same, but the actual person and phone number are different.
If using “Load a contact” is not an option, you should enter the same
contact information (your own) as you did in “Points of Contact”.
Navigation Panel: Resource Distribution:
*
Distribution Information>Distributor (58) – Because this
information was entered into the template you imported, this
contact information should be complete. If not enter the
information or use the Contact Manager if available.
End of Step 1: Recap
Step 2: Fields – Entity and Attribute Information
*
Overview Description (61)
*
Entity Type Details (62)
*
Fields (63-66)
Navigation Panel: Resource>Fields:
*
Overview Description (61) – In the lower half of the screen,
expand “Overview Description”, or if necessary click on “+ New
Overview” to create this section. In the “Summary” box enter
Minimal core, common attributes are stored with each feature.
ESITE item relates to ADDRESS_POINT, master address file for
County. Detailed business attributes exist for a number of
domains, such as SCHSITE, and Transit group data.
The “Overview Description” is not a Required element, but can be
useful in further describing your data set and its fields beyond what
you might mention in your “Abstract”. If you opt to complete the
“Overview Description” you will need to enter a “Citation” in the box
below. Enter King County.
*
Entity Type Description (62) - In the upper portion of the screen,
you should see “Details: common_interest_point”. This is the
section for the details of each attribute which you will do next.
But first you have to document the entity itself. Click on the “+
New Entity and Attribute Details” to create this section. The
“Label” box may be completed with “common_interest_point”. If not,
enter “common_interest_point”.
Expand “Entity Type” where you should see:
*
Object – Enter Feature class
*
Count – There should be a number here, indicating the number of
records in the feature class. Leave this number alone, even though
it is editable, as it is synchronized. If it remains blank, it
will likely synchronize later.
*
Definition – Enter Attribute table for COMMON INTEREST
*
Definition Source – Enter King County
*
Fields (Attributes) (63-66) – You should now be left with a fairly
long list of ! hints, mostly referring to missing attribute
definitions, attribute source definitions and attribute domains.
There are still 2 entity type errors also.
Expand the “Details: common_interest_point” section (right under the
bold “Entity and Attribute Information” title) to open the list of all
the attributes in this data set. Each attribute is expandable to show
its specific details. Although this field section is multi-layered, it
is actually fairly straightforward to update and provides very
important information to users of your data.
Before getting to any individual attribute, resolve the entity
omissions by expanding “Entity Type”, found just below the “Label”.
This is the same information as provided above, so just enter
Attribute table for COMMON INTEREST and King County in “Definition”
and “Definition Source”, respectively.
We won’t try to resolve all of the remaining attribute definition
omissions during this exercise. However, you will do a few to
investigate how to document various types of attributes.
When you are working on your own data you will want to consider the
best way to document the attributes. Which ones should be Enumerated,
which as Range Domains, and which as Unrepresentable Domains?
Remember, ArcCatalog will synchronize the attribute (field) names but
it will not make any interpretation of the values in any attribute.
One idea is to use the Frequency_analysis tool in ArcToolBox to
determine the unique set of domains for any items you think should be
enumerated in order to best explain the data set to your users.
First, let’s work on “CODE”. Go to “Attribute: CODE” and click on the
arrow next to its name to expand it.
Just like with “Entity Type” you need to complete “Definition” and
“Definition Source”.
The Codes are the numeric values that define the different groups or
classes of real-world features. For “Definition” enter Code defining
type of feature. Use King County again for “Definition Source”.
This completes the required information for the Attribute. Now you
need to address its domain.
As this attribute will best be served by detailing its enumerations
(that is, its different codes), click “+ New Enumerated Domain”. Three
values are required – “Value”, “Definition” and “Definition Source”.
“Value” – Assume that from source information you know that “30” means
“Airport”, “60” means “Non-Government Building”, “66” means “Fire
Station”, etc.
Using this information, complete these 3 records for the Enumerated
Domain section:
In the “Value” box, enter 30.
In the “Definition” box, enter Airport.
In the “Definition Source” box, enter King County
Once you add the domain information for “Airport”, again click “+ New
Enumerated Domain” to create another stanza, where you can add the
value 60 and its meaning (Non-Government Building), and its source (King
County).
Finally, add one more enumeration - value 66 (Fire Station and King
County, for Definition and Source, respectively).
As you proceed you will see the list of hints at the top shrink.
You could continue with this process to add all the required domain
values. It is up to you to completely and correctly add the
information, as ArcGIS makes no connection (i.e., no synchronization)
between the Attribute domains and the feature class. It only
synchronizes to the Attribute name.
Now scroll up to Attribute “OBJECTID”. Expand it and see that it is
already filled in due to synchronization. This is also true of the
“Shape” item.
Expand item “FEATURE_ID”. Like “CODE” it has its required “Definition”
and “Definition Source”. This item is a primary key displayed as a
unique integer. Complete the “Definition” and “Definition Source”,
with Unique user-defined integer assigned to each feature and King
County, respectively.
What type of domain is appropriate for this item? You could choose
either “Range Domain” or “Unrepresentable Domain”. Let’s assume a
Range Domain is your choice – what information do you need?
Save your edits. This will close the Editor. Click on the “Preview”
tab at the top, the tab to the left of the “Description” tab.
In the “Preview” dialog at the bottom of the screen, change
“Geography” to “Table”.
Right click on “FEATURE_ID” and choose “Sort Ascending”. The lowest
FEATURE_ID value is _______.
Right click again and choose “Sort Descending”. The highest FEATURE_ID
is ________.
Go back to the “Description” tab. Restart the Editor and go back to
the Resource>Fields section. Notice that when you exited, all the
sections that were expanded have now collapsed. So you will need to
expand the top “Details”, then expand attribute “FEATURE_ID”, finally
click on “+ New Range Domain”. Notice the two required items are
“Minimum” and “Maximum”. Use the information you just gathered to
complete these “Minimum” and “Maximum” tags for FEATURE_ID.
Collapse all the expanded Attribute sections so you are just looking
at the list of attributes in the metadata. All these attributes would
need to be documented for completeness, but we will choose just one
more. Let’s choose one that would be a likely candidate for an
Unrepresentable Domain. Possible choices might be “NAME”, “ABB_NAME”,
“ADDRESS“ and “ZIPCODE“.
Expand the Attribute “NAME”
This attribute stores the common name for the feature, such as the
name of the school, library, fire station, etc.
Though each of these values is unique, each value fully describes its
feature (that is, no codes are used) so it would not be very logical
to enumerate each domain value like you did for the CODE attribute.
At the same time, a Range Domain would not be appropriate. So this is
a good candidate for an Unrepresentable Domain.
First, complete the “Definition”, enter The name of the feature
Second, complete the “Definition Source”, enter King County
Create a new “Unrepresentable Domain” by clicking “+ New
Unrepresentable Domain”.
It provides a single box (It is unclear why it is not “red”, as all
attributes require a domain of one type or the other). Here is where
you enter a statement that globally describes the universe of values
for this item. You would not want to state “The name of the feature”
as this is the definition of the attribute, which you already did.
Rather, enter Feature name as mixed case text, without abbreviations.
End of Step 2: Recap
Step 3: Quality and Lineage
*
Conceptual Consistency (53)
*
Completeness Omission (54)
*
Quantitative Attribute Accuracy (55)
*
Absolute External Positional Accuracy (56)
*
Lineage Process Steps (57)
Navigation Panel: Resource>Quality
Click on “+ New Report”. Repeat this 3 more times, so there are 4
report sections. Expand the first report, if not already expanded, and
choose Conceptual Consistency from the drop-down menu. Repeat this
process for the 3 remaining reports, setting them to Completeness
Omission, Absolute External Positional Accuracy, and Quantitative
Attribute Accuracy.
If you expand “Measure” for each report you will see the required
“Description” where you can describe the report more. For each of the
reports, enter the following information into the “Description”:
*
Conceptual Consistency (53) - This report is also referred to as
“Logical Consistency”. Click on “Measure” to get a “Description”
box. In the “Description” box enter Each named feature is
represented by a single point, closely approximating the centroid
of the feature. Multiple points may exist at the same XY location
if different named feature, representing more than one domain
(class) are collocated.
*
Completeness Omission (54) – Again, create a “Description” box.
Enter This layer contains all points (features) maintained as
common points of interest. Children feature classes, such as
SCHSITE_POINT, FIRESTN_POINT, etc, are a subset of this layer.
Thus a point (record) for a given named feature will exist both in
COMMON_INTEREST_POINT as well as the child feature class derived
by a selection on a value of one or more domains.
*
Quantitative Attribute Accuracy (55) - In the “Description” box
enter Data updated using feature websites where possible. Address
accuracy validated against ADDRESS_POINT master County database.
*
Absolute External Positional Accuracy (56) – In the “Description”
box enter Locations correlated against ADDRESS_POINT reflect
accuracy of those source points. Some locations are readjusted
against orthoimagery where a better fit is found.
After completing the report entries, you will likely see several
omission hints (!) at the top of the editor page. These indicate that
the reports need additional information describing the results of the
evaluations. For now this detail is being ignored. If you have
quantitative results for any report they could be added, but generally
just getting a general explanation of each Quality report is a good
start.
Navigation Panel: Resource>Lineage
*
Lineage Process Steps (57)
Add a Process Step (+ New Process Step) and you will see a required
“Process Description” and a required “Process Step Date”. Providing a
lineage or a history for your data set is very useful. You can
continually add Process Steps to build up a history of how your data
set was created modified and maintained. Here is what is written on
our actual Spatial Data Catalog site for first Process Step for
COMMON_INTEREST_POINT.
ASSEMBLING COMPONENTS: The data from the following layers was
assembled into a single COMMON_INTEREST table (with coordinate
values). Duplicate records were flagged based on the value of the NAME
item. LANDMARK_POINT was dominant where it occurred, though values
were gathered from other layers as necessary. Assembled layers:
SCHSITE_POINT FIRESTN_POINT POINOPUB_POINT POIPUB_POINT
PUBLIC_CLINIC_POINT HOSPITAL_POINT KC_LOC_POINT LANDMARK_POINT
BIKE_LOCKERS_POINT ELECTRICAL_OUTLETS_POINT NEIGHBORHOOD_CENTERS_POINT
PARKRIDE_POINT TRANSIT_CENTERS_POINT PARK_ADDRESS_POINT
For this exercise, just enter Assembled components from multiple data
sets in the Process Description box.
You can skip over the “Rationale”, but use the calendar next to
“Process Step Date” to enter a date of October 1, 2009. When the
calendar opens, click on the header to change the format to year/month
rather than month/day. This will allow you to use the left arrow to
move back in full year increments. When you get to 2009, click on
“October” and set the day.
End of Step 3: Recap
Step 4: Constraints and Keywords
*
Use Limitation (39)
*
Distribution Liability (50)
*
Access Constraint (50)
*
Thematic Keywords (40)
*
Place Keywords (40)
Navigation Panel: Overview>Item Description
*
Use Limitation (39)
Esri has made the three types of constraints – Distribution, Access
and Use - a whole lot more confusing then they were before. But let’s
try to walk through it.
Go to the Overview>Item Description section. Scroll to the bottom of
the screen and click “+ Use Limitation” section if not already there.
(It’s just above the globe icon).
Here is where you would add any constraints on how the data should be
used after it is accessed. For example, you may have standard language
similar to King County data are made available with the understanding
that they shall be used exclusively by the obtainer or his/her
authorized agents. Digital products may not be reproduced or
redistributed in any form or by any means without the express written
authorization of King County.
At this point it’s a good idea to Save. This will exit the Editor, so
reopen the Editor and proceed.
Navigation Panel: Resource>Constraints
======================================
There should see a second “General Constraints” section. Expand it by
clicking on the arrow. You will see this is the same information you
added in the “Item Description>Use Limitation” section above.
*
Distribution Liability (50)
Click on “+ New Legal Constraints”. Within this box create a “New Use
Limitation” section. You should get a required “Use Limitation” box.
This is actually the “Distribution Liability” statement, such as: King
County disclaims any warranty of use of any digital product or data
beyond that for which it was designed. This should be the statement of
liability assumed by the Distributor.
*
Access Constraint (50)
Now, within “Legal Constraints” click on “ + New Other Constraints”.
This is the FGDC “Access Constraints” section. Here you would put the
legal and technical restrictions for accessing the data. This section
may not be red, indicating there still seem to be some inconsistencies
in how the FGDC standard is applied in ArcGIS metadata. For this
exercise, enter No restrictions
The result is you should have on this one page the 3
constraint/restriction clauses: Distribution, Access, and Use.
Navigation Panel: Overview>Topics & Keywords
============================================
*
Theme Keywords (40) – Click on “+ New Theme Keywords” to create
this section. Enter the following: points of interest, schools,
hospitals, fire stations, police stations. Because there are many
classes of features in this data set you could add many more
keywords to improve discoverability of this data set.
These keywords can be added as a string, like above, but they appear
more readable, and are more easily parsed, when entered one per line
in the Keyword box as:
points of interest
schools
hospitals
…
You can also check the box for related categories in the “Topic
Categories” above which will enter some of the standard ISO19115
keywords. Logical choices for COMMON_INTEREST_POINT might be Location,
Society, and Structure.
*
Place Keywords (40) – Create a section as you did for Theme
Keywords. Enter King County, Washington, and Pacific Northwest in
the same way you just entered the Theme Keywords.
End of Step 4: Recap
Step 5: Resource Citation and Other Miscellaneous
*
Resource Citation (41)
*
Resource Citation Contacts (42)
*
Browse Graphic (46)
*
Spatial Data Representation (52)
*
Distribution Format, Ordering, and Digital Transfer Options
(58-60)
*
Metadata Update Frequency (44)
Navigation Panel: Overview>Citation
*
Resource Citation (41)
If necessary, expand the “Dates” box. It may cause a hint
(“Publication date” is required) to appear. Using the “Published”
calendar icon, choose the date that best represent when this data set
was originally published. For COMMON_INTEREST_POINT, this was
September 30, 2009 (when it was put in the public Spatial Data
Warehouse for the first time.)
“Title” (at the top of this page) should be carried over from the Item
Description Title at the beginning of the metadata. “Presentation
Form” and “FGDC Geospatial Data Presentation Form” should also have
defaults of Digital Map and Vector Digital Data, respectively. You
have the option to modify these using the drop-down menus.
Navigation Panel: Overview>Citation Contacts
*
Resource Citation Contacts (42)
If no contact section is present, click on “New Contact” to create
this section.
Here is one more location where contact information is required.
However, this is usually used as a more generic citation, rather than
a person specific citation. Required information includes “Name” and
“Organization”, where you can enter King County in both fields. For
“Role” choose from the drop-down menu, where Originator reflects the
Organization’s role.
Similar contact information is required in the “Contact Information”
section. This would include: “Address Type”, “City”, ‘State”, “Postal
Code”, “Country” and “Phone”. Again, “Address” is not hinted as
required, but it would be logical to enter it.
Navigation Panel: Resource>Details
----------------------------------
*
Browse Graphic (46)
Notice what happens when you click on the + in front of “New Browse
Graphic” to create this section. You now have three new “Required”
hints. It’s not clear why this section is not automatically expanded
as it is required. This section is good for putting in an external
http path for access to a thumbnail image for the data set. Even
though you have added a thumbnail image to the ArcGIS metadata in an
earlier exercise, that thumbnail will not be preserved when the
metadata is exported to an FGDC file. So adding a browse graphic path
will provide a stand-alone path to an image regardless of the format
of the metadata.
“File name” is the same jpg image you used earlier, however its path
is an external link as our Spatial Data Catalog is public-facing:
http://www5.kingcounty.gov/sdc/dataimages/common_interest.jpg
For “Description”, enter Extent of data set shown on County boundary
For “File type”, enter JPEG
Alternatively, you could just enter “None” in each field. The editor
does not constrain your entry – you are still responsible for putting
in correct and valid information. However, “None” would be a valid
entry if this metadata was documenting a table for which an image
would not be logical.
Navigation Panel: Resource>Spatial Data Representation
*
Spatial Data Representation (52)
It’s worth a brief visit to the Spatial Data Representation section,
where the information regarding the topology, geometry and record
count area automatically populated by synchronization. Expand “Vector
Representation” to view this information. This information is
automatically harvested from the data set, so there is nothing else to
add here.
Navigation Panel: Resource>Distribution
*
Distribution Format, Transfer and Ordering (58-60)
Unfortunately, the FDGC Standard for this section is overly
detailed and complex, and Esri’s implementation did not help
matters. On the other hand there are only a few key pieces of
information that are required in this section, and a little
experience will get you comfortable with checking these off.
Nonetheless, these items are important in making it easier for
users of your metadata to be able to get their hands on your data.
*
At the top of this section, expand the “Distribution Format”
section. “Format Name” and “Format Version” are required. Enter
File Geodatabase Feature Class for the first (if not already
populated), and Version 10.x for the second item (where x is
version of ArcGIS you are using.
*
You previously have worked on the “Distributor” section,
completing the “Contact” information. Expand the “Distributor”
section again, and then expand/create the “New Ordering Process”
section. Information in the “Fees” section can be handled by
providing a URL to a website where you state your agencies
procedures and data distribution costs, etc. For the purpose of
this exercise you can enter:
http://www.kingcounty.gov/operations/GIS/GISData/GISDataDistribution.aspx
*
Within the “Distributor” section, expand the “Online Resource”
section (You may need to create a “+ New Digital Transfer
Options”, followed by a “+New Online Resource”). Here is the first
of two locations where you can store information about where your
data is available, assuming it is online (there are other sections
if it is offline). In “Linkage”, for the purposes of this
exercise, enter /plibrary2/admin/shapes/point/common_interest.shp,
to represent the path to accessing the data within the King County
network.
*
Below the “Distributor” section, you will see another “+ New
Digital Transfer Options” section. Create/expand this section, and
then create/expand the “+ New Online Resource” section within it.
This can be used to state other transfer options. At King County
we use this “Linkage” field to reference
http://www5.kingcounty.gov/gisdataportal/ - our online GIS Data
Portal. Under “Function”, Download can be chosen to indicate this.
*
This layout of Distribution information within the metadata can be
handled other ways, but this exercise indicates the way we have
found that best stores the data so that it exports well, but not
perfectly, to what we wish to see in FGDC format.
Navigation Panel: Metadata>Maintenance
*
Metadata Update Frequency (44)
Finally, you have completed your metadata. Make one more visit to this
section. “Metadata Update Frequency” is required. Choose an
appropriate value from the drop-down menu. If your earlier choice of
As Needed was used for the frequency the data itself then this same
value is likely appropriate for the Metadata Update Frequency. The
current date is automatically calculated for the Metadata Date Stamp,
and displayed in Metadata>Details.
End of Step 5: Recap
6. Quality Assessment and Publication (Optional)
Before you move your metadata to production, you can review your
overall status by scanning the Navigation Panel. Do you see all green
checkmarks or are there some remaining red X’s? At minimum, you should
still see a red X on “Fields” as we did not document all of the
attributes in this exercise. There may also be a red X on “Citation
Contacts” due to the one remaining “! An originator is required”.
Finally, there may be a red X on “Quality” due to the following:
which were not resolved. There are still some discrepancies between
what is considered necessary for a complete FGDC version vs. what is
interpreted by Esri.
Though getting all the tags correct as far as a complete,
standard-compliant document is great, remember that the main reason
you do metadata is to supply the “real world” subjective information
that explains the data and how to use it. In other words, you should
be a lot more concerned about a missing Abstract than a missing tag in
a less important section.
Familiarity with the FGDC standard should be used in conjunction with
the inline hints and the QA MP tool to reach a goal of producing
useful, informative metadata, even if there are a few minor issues.
Follow these last steps to export your metadata and process it for
html publication. You will also generate an MP error report for
comparison to the inline report.
1.
Using the Export Tool on your metadata toolbar, Export
COMMON_INTEREST_POINT’s metadata to the folder:
C:\Student\CreatingMetadata\Output as “common_interest_EX10.xml”
2.
Using the USGS MP Metadata Translator tool, found in the
ArcToolBox Conversion Toolbox>Metadata Toolset, complete your
dialog as:
Source Metadata:
c:\Student\CreatingMetadata\Output\common_interestEX10.xml
Configuration File: (leave blank)
Conversion Type (optional): Chose FAQ from drop-down menu
Output File (optional):
c:\Student\CreatingMetadata\Output\common_interestEX10_faq.htm
Log File (optional):
c:\Student\CreatingMetadata\Output\common_interestEX10_error.txt
Execute the tool.
3.
Using Windows Explorer, navigate to the Output folder:
Inspect the htm document. This is the Frequently-Asked-Questions
format. Click on “6. How does the data set represent geographic
features? ” Notice how this style of html formats the attribute
section, putting the Range and Enumerated Domain information in more
easy-to-read tables.
4. Open the common_interest_error.txt file. This is the error log
generated by MP about the completeness of your metadata. You should
find few errors, outside of the intentionally skipped attributes,
still in your metadata. However, even with the most diligent effort,
just like the omissions (red Xs) in ArcCatalog’s Editor, you may not
be able to remove them all. Some of this is likely due to
inconsistencies (i.e., read ‘bugs’) in how Esri has implemented the
new metadata model. Hopefully, as this new model matures, more of
these issues will be resolved.
Congratulations! You can now close your active windows and exit
ArcCatalog.
18
 BIBLIOGRAFIA RECOMENDADA POR LOS PONENTES DE LOS CURSOS
  PLIEGO DE CONDICIONES CDC050DGCDOMI2021 PAVIMENTACION CON CONCRETO HIDRAULICO DE
 TAX II CHAPTER 15 SPRING 2013 NOTES CHAPTER FIFTEEN
 TEST HARNESS OPERATIONAL CONCEPT DOCUMENT VERSION 20 RELEASE CSE
 HEALTH AND WELLBEING ACROSS LEARNING RESPONSIBILITIES OF ALL PRINCIPLES
 9OSNOVNA ŠOLA VIŽMARJE BROD NA GAJU 2 1000 LJUBLJANA
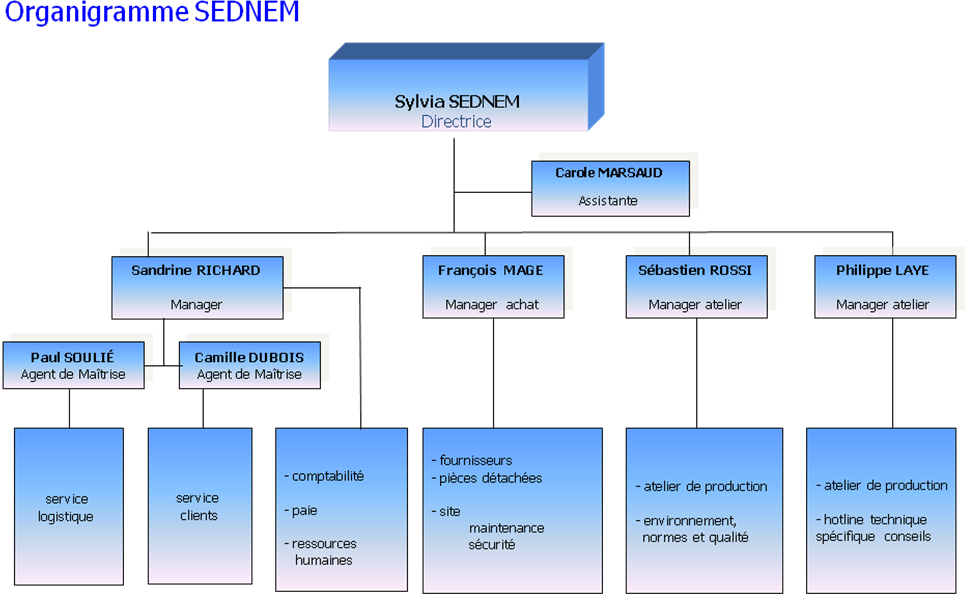 DOSSIER ÉTUDIANT (D1) SEDNEM ET SON PROCESSUS D’ACHAT AMÉLIORER
 ZAŁĄCZNIK NR 13 DO REGULAMINU REKRUTACJI I PRZYZNAWANIA ŚRODKÓW
 CAP 04 ESTÉTICA Y ARTE Ñ VOLVER AL ÍNDICE
 INTEGRANTES BRUNO DENARDI FEDERICO HENZENN FEDERICO MIE JOSE PRON
 PATRONATO INCA CGIL SEDE DI TORINO VIA CARLO